Integrating SimpleSAMLphp with Drupal using drupalauth4ssp and simplesamlphp_auth for IdP and SP sites
This guide (and its title) is so long because this is the level of detail and explanation I needed when I started learning about SAML and Drupal. It was hard to find anything that gave me the what and the why of how SAML worked and how I could successfully integrate it with my Drupal websites. My hope is that you can always ignore what you don’t need and appreciate everything else.
The goal of this guide is to help you understand SAML and Drupal enough to setup and maintain Single Sign-On connections between your Identity Provider (IdP) and Service Providers (SP).
Disclaimer: I am not claiming to be an expert ad SAML, Drupal, or anything else. Implement this at your own risk and expense. The guide provided below is simply my learned experience from my own implementations and I cannot guarantee your success. You still have to learn your own lessons.
CONTENTS
1. Introduction
This guide is designed to help you understand SAML (using SimpleSAMLphp v2.1+), why we use it, and how it works to serve website users. The only outputs are a working SAML connection between two points – the IdP (Identity Provider) and the SP (Service Provider).
Why Single Sign-On with SAML? SAML allows us to create a single-sign-on experience for our users so that they only have to remember one password for multiple sites. Over the years, users I’ve served have been extremely frustrated when they’ve needed to reset a password on one site, only to find out that they weren’t resetting the correct one for what they thought were trying to access. My goal is to simplify my environment for them so that they only have to remember account information in one place, and they can access all website services appropriately.
SAML Security: SAML connections are manually established between the IdP and SP over secure, encrypted connections. Both sides MUST exchange information and configure their connections; no SAML connections are able to be established in a one-sided manor.
Assumptions: This guide is written from the perspective of a LAMP stack (Ubuntu Linux, Apache 2.4, PHP 8.1+, MySQL). Your environment may be different, so, when you’re doing some of the Apache-related tasks, check for what the best methods are for your system. Second, I have no experience with NGINX, so I can’t describe how that works differently from Apache. Other tutorials I found on the internet give guidance for that kind of environment, so you should be able to find a comparable example if that’s what you are running.
Additionally, in 2024 and beyond, you should be using Drupal version 10+, Drush version 12+, and Composer version 2.6+. While many of these settings will work for Drupal 8+, those versions are no longer supported with security updates and should be upgraded to the latest stable version of Drupal immediately. SimpleSAMLphp is using version 2.1+ for this tutorial.
2. Scope
The SCOPE of SAML is that it is installed as a component of our Drupal websites. In the IdP, it is required as a dependency of the drupalauth4ssp module and in the SP’s it is required as a dependency of the simplesamlphp_auth module. In both cases SimpleSAMLphp is found in each site’s [site root]/vendor/simplesamlphp* folder. In addition, we create each site’s configuration files in the [site root]/simplesamlphp/dev* folder in each directory. There’s also additional information in the /etc/apache2/sites-available/*.conf files.
SAML’s operating scope is to provide seamless communication between the IdP and the SP’s. All of these connections are managed within the above folder structures and work is done mostly at the command line/FTP level with some work being done in Drupal for the User information being passed back and forth.
*NOTE: I’ll be using the following variables throughout this tutorial:
[site root]= this is equivalent to the root directory for your website. If you’re running Drupal, then it is whichever directory the web/ folder is residing in. The assumption is that all [site root] references should be accessed from the command line or FTP[your site]= this is the domain name or subdomain your website resolves to when accessing via an internet browser like Chrome or Firefox.
3. Specific Procedures
3.1. Dependencies
The way to have SAML setup, is to have it required as a dependency of Drupal. Therefore, a good working knowledge of Composer, Drush, and Drupal’s user login and access management system (Roles) is needed.
Beyond that, a developer should have at least a basic understanding of what SAML is doing and why.
3.2. Background
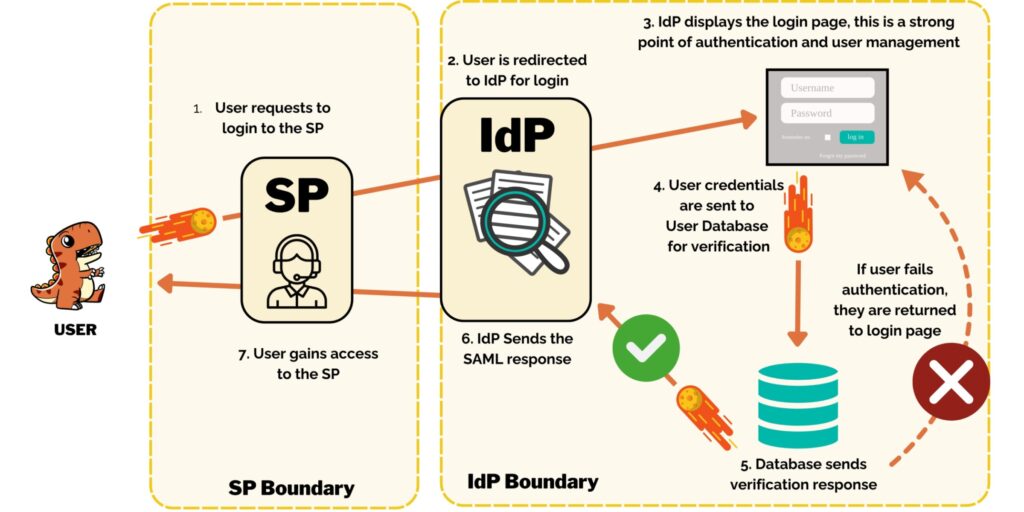
SAML connects the IdP (Identity Provider) and SP (Service Provider) in a manually established, secure connection. The above infographic shows how a user requests authentication at an SP authentication URL (for example: https://[your sp site]/saml_login). The user is then directed to the IdP login page and is asked to setup an account or enter their credentials(for example: https://[your idp site]/user/login). Once they can authenticate, their request is checked against the user database (in this case, in Drupal) and they are either rebuffed or sent back to the SP with a token if successful. The token tells the SP that the IdP has successfully verified this user and gives the SP some basic information about the user for account management on the SP side if needed (we mostly care about roles).
Our SAML is setup to store/manage these authentication tokens in our MySQL database. You may care to research alternative methods for your situation and security needs.
3.2.1. Understanding how SimpleSAML IdP’s and SP’s work
Setting up a Drupal site to become an IdP or SP:
First determine which site is going to be which, I suggest drawing yourself a diagram. If you’re setting up multiple sites and you know which one is going to be the one where people login and authenticate, that’s going to be your IdP – where you do all your user management – and everything else is going to be an SP.
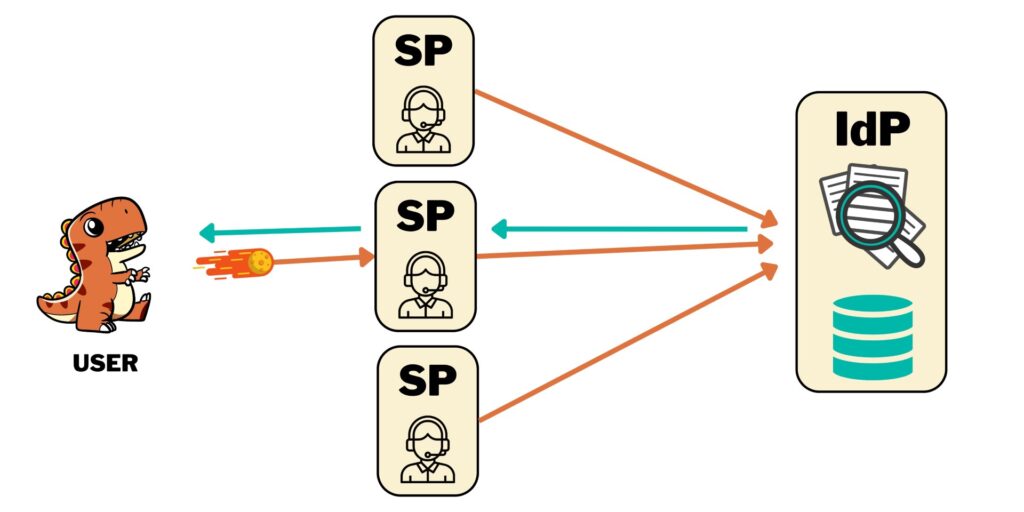
In a best-case scenario, you might want to think about making the IdP its own subdomain like idp.domain.com, then all your other websites will resolve to their own subdomains (sp1.domain.com, intranet.domain.com, community.domain.com) and your main website will resolve at domain.com. This allows you to have really focused user management controls on your IDP site and disable local user login on all other sites so that you don’t need all the additional authentication and protection components that your IdP does (reducing attack surfaces).
3.2.2. Setting up a Drupal site to be an Identity Provider (IdP)
To add the correct SAML components to your IdP, you need to go to the command line and run: composer require ‘drupalauth/simplesamlphp-module-drupalauth:^2.10@RC’ ‘drupal/drupalauth4ssp:^2.0@RC’
This will install the SimpleSAMLphp drupalauth module into your [site root]/vendor/simplesamlphp/simplesamlphp/modules folder (it makes communication between Drupal and SimpleSAMLphp possible), followed by the DrupalAuth4SSp module into Drupal. Next, enable DrupalAuth4SSp with drush:drush en drupalauth4ssp
3.2.2.1. IdP Drupal Settings
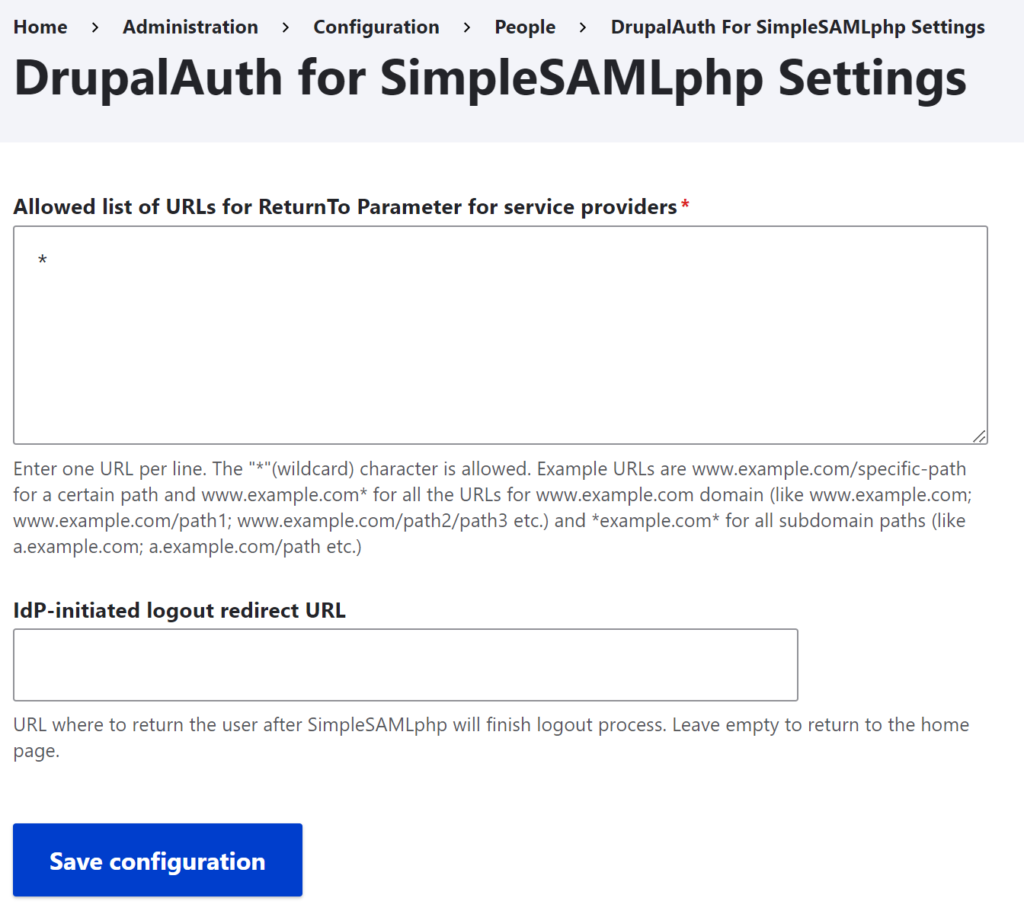
If your IdP is a Drupal website, it needs to leverage the drupalauth4ssp module to connect the Drupal website to SimpleSAMLphp. The setup within Drupal is very simple, with only one module configuration page: (https://[your site]/admin/config/people/drupalauth4ssp).
The allowed list of ReturnTo Parameters is limited to the SP’s we trust and are connected to. By default, this uses an asterisk (*) to allow for returning to any SP that we’ve connected to. Leaning toward a more secure posture, I suggest explicitly naming which SP’s you are connecting to.
I don’t set the IdP-Initiated logout redirect URL mostly because I’ve been happy returning people to the home page after they log out.
3.2.3. IDP SAML Files
In this section, we look at what it takes to setup SAML to work in conjunction with Drupal. We’ll be focusing on the needs of SAML at this point, since the Drupal side of things should be in a good place on the IdP and we’ll be setting the SP Drupal settings up in just a bit.
3.2.3.1. Apache Config Files
In order for your SAML to be made available to the internet, you need to create a symlink or alias for it. Here, you also make simplesamlphp’s public directory open to the public. This is intentional, the public directory is designed to be a web user interface for SAML management.
The files you need are the .conf files, found in /etc/apache2/sites-available/[website].conf
When you edit one of these .conf files, you’ll need to create a section inside your site’s <virtualhost> tags (probably at the bottom), for SAML with the following parameters.
# ****************************************# ENVIRONMENT VARIABLESSetEnv SIMPLESAMLPHP_CONFIG DIR /var/www/html/[site root]/simplesamlphp/dev/config# Set an alias to the SimpleSAML directory# In some systems this is setup as a symlink, but I prefer this method.Alias /idp /var/www/html/[site root]/vendor/simplesamlphp/simplesamlphp/public# OR for SP:# Alias /simplesaml /var/www/html/[site root]/vendor/simplesamlphp/simplesamlphp/public# Set Access Rights<Directory /var/www/html/[site root]/vendor/simplesamlphp/simplesamlphp/public> |
The first block of code sets a SimpleSAMLphp environment variable that tells SimpleSAMLphp in the /var/www/html/[site root]/vendor/simplesamlphp/simplesamlphp directory to look in /var/www/html/[site root]/simplesamlphp/dev/config directory for all configuration settings.
Why do this? Because we don’t want Composer overwriting our configuration settings with default code and breaking SAML whenever it has an update (believe me, that’s frustrating). This puts all the SAML settings in a location we control.
The next piece sets an alias for the directory: /var/www/html/[site root]/vendor/simplesamlphp/simplesamlphp/public to resolve at https://[IdP site root]/idp or https://[SP site root]/simplesaml for SP’s. This is SAML’s web-facing interface where we can check on the operability of our SAML, test authentication methods, and convert metadata. (note, you can also do this with a symbolic link, described in other tutorials. I find symlinks to be troublesome, so I use this method.)
Last, we set view access rights by allowing the public directory access to the greater internet.
3.2.4. The Local IdP & SP Configuration Settings
NOTE: This section applies to both the IdP AND SP setups. Understanding it and setting it up is critical to your success.
Current Location: /var/www/html/[site root]/simplesamlphp/dev/
You’re probably wondering where this directory came from. You must create it and copy some files from your /var/www/html/[site root]/vendor/simplesamlphp/simplesamlphp/ folders.
Here’s the folder structure you want:
/var/www/html/[site root]/- simplesamlphp/
- dev/
- certs/
- certificate.pem (you generate this)
- certificate.crt (you generate this)
- config/
- authsources.php (copy from vendor folder)
- config.php (copy from vendor folder)
- data/
- log/
- metadata/
- saml20-idp-hosted.php (copy from vendor folder)
- saml20-idp-remote.php (copy from vendor folder)
- saml20-sp-remote.php (copy from vendor folder)
- tmp/
- certs/
- prod/
- certs/
- certificate.pem (you generate this)
- certificate.crt (you generate this)
- config/
- authsources.php (copy from vendor folder)
- config.php (copy from vendor folder)
- data/
- log/
- metadata/
- saml20-idp-hosted.php (copy from vendor folder)
- saml20-idp-remote.php (copy from vendor folder)
- saml20-sp-remote.php (copy from vendor folder)
- tmp/
- certs/
- dev/
Apache should have access to the data/, log/, and tmp/ folders.
Note that in your Apache .conf settings, the dev/ portion above should be updated to prod/ when you go to production. You can point to one or the other depending on the environment you’re in.
3.2.4.1. Certificates
Current Location: /var/www/html/[site root]/simplesamlphp/dev/certs
Your encryption certificates live in this folder.
If you are reading this, please stop and set yourself a calendar reminder right now for a week or two before YOUR certificates expire to reissue them and update all your SP’s with new metadata.
| Mini Tutorial: Creating Certificates Note: The file names for both certificates below can be named anything, you may want to be more descriptive than the examples provided below. In the command line, go to your certs directory: /var/www/html/[IdP site root]/simplesamlphp/dev/certs Run the following command to generate some X.509 certificates for the IdP. openssl req -newkey rsa:3072 -new -x509 -days 3652 -nodes -out idp_simplesaml.crt -keyout idp_simplesaml.pemYou only need to create the IdP certificates when you set it up or need to renew the certificates. Now, head to the same directory in your SP: /var/www/html/[SP site root]/simplesamlphp/dev/certsAnd generate a new certificate as well. openssl req -newkey rsa:3072 -new -x509 -days 3652 -nodes -out sp_ These certificates should NOT be stored in a Git repository. Because they are essentially authentication and encryption credentials, they pose a security risk that shouldn’t be maintained in a publicly accessible place. One option is to place them in a more secure place and create a symbolic link in your certs directory during the deployment process so that the system thinks they’re in the right place. Additionally, these certs last for 3652 days or about 10 years. This might not be the best practice but should be okay for a locked down Dev server. Rotating certificates every 1-5 years for production is what I’m seeing. |
3.2.4.2. Authsources.php
Current Location: /var/www/html/[site root]/simplesamlphp/dev/config
The Authsources file defines where SimpleSAMLphp looks for users to be authenticated (the user database). I typically only have one Authentication source. It uses Drupal’s login page for authentication.
In the past, I had an experience where there was an update that broke something, and we did setup the another Authsource which used SimpleSAMLphp’s login page to authenticate users instead of Drupal’s. It still checked Drupal’s user database, but required that I theme the SimpleSAMLphp UI to look like our website.
I do not recommend this because even though the SimpleSAMLphp documentation says you can create your own theme, the only way I could find do to it was by overwriting the original SAML files instead of the system allowing me to create a custom theme module like you’re supposed to do. This means that whenever SimpleSAMLphp updates its code, Composer would overwrite the UI changes. Fortunately, I found a fix for the Drupalauth4ssp module and was able to go back to using the Drupal login page and authsource:drupal-userpass before we ran into any other issues.
An example of the authsources.php file can be found in the Appendices at the end of this webpage. Note that additional code comments explaining things are in the actual file but have been stripped out here for brevity.
One important thing to know about the attributes array is that if a user has not filled in a field in their user profile, the field will simply not show up when you are testing federated sources or when a connection is sent to an SP. So, if you need to test and make sure all fields are populating, make sure that those fields are all filled in on the user account on the IdP you’re testing the connection with.
3.2.4.3. The Config.php file
Config file is where the primary SAML config settings live. There’s a lot in this file to know about. I’m going to break it down, section by section. In addition, in the example code found in the Appendices, I’m going to highlight the parts of the file I think you should pay special attention to.
- Basic Configuration Options
- Know about all of these, you want to make sure that your baseurlpath is the same as the alias setup in the
/etc/apache2/sites-available/.conffiles - The directories for logging, temp, certs, are all absolute in my current version, but they can be relative. I just wanted to be sure of where the files were going to end up and the relative URLs were confusing while I was learning. I’m still not sure if relative URLs are based from the site root, SAML’s public root (
[site root]/vendor/simplesamlphp/simplesamlphp/public), or another directory, so absolute file locations is better for me.
- Know about all of these, you want to make sure that your baseurlpath is the same as the alias setup in the
- Security Configuration Options
- Secret Salt – if you change this, it’s bad news for logged in users. It doesn’t need to change, so best to leave it alone unless you’re worried about a security breach issue.
- auth.adminpassword sets the password for SAML’s core auth module, we should improve this password at some point and probably set different ones for each site/SP & the IdP.
- trusted.url.domains – which domains we trust to connect to. This is like defaulting all ports on a server to closed and manually opening them up if you want them open.
- Errors and Debugging
- Turn on or off visible errors. I recommend leaving off most of the time.
- Logging and Statistics
- Important for troubleshooting and security management
- Proxy Configuration
- Ignored, no proxy at the moment.
- Database Configuration
- We do use MySQL to manage all our SAML cookies. Seems to work reliably without much system burden.
- Protocols
- If you’re looking at the IDP, we want the saml20-idp to be true
- for the SP, saml20-idp should be false.
- Modules
- We want to enable:
- Core – runs SAML as a service
- SAML – runs SAML as a service
- Admin – grants access to the SAML login page at
- Cron – runs cron
- Drupalauth – provides the necessary code to authenticate using Drupal’s user database
- We want to enable:
- Session Configuration
- These settings determine how long user sessions last (default is 8 hours)
- Memcache configuration
- Not used
- Language and Internationalization
- Language settings for SAML, not really used.
- Appearance
- It’s possible to theme SAML, but for the most part, we ignore these settings since Developers are the only ones to see the SAML pages
- Theme.use – If you do choose to override the SAML theme, you’ll need to change this setting.
- Discovery Service
- Never changed these settings / left as default
- Authentication Processing Filters
- Never changed these settings / left as default
- Metadata Configuration
- Never changed these settings / left as default
- Data Store Configuration
- The store.sql settings are important, they connect to the MySQL database we use for SAML token storing.
- The other contact information should lead to somewhere people can contact.
3.2.4.4. Metadata
Current Location: /var/www/html/[site root]/simplesamlphp/dev/metadata/
The metadata folder holds three important files:
- Saml20-idp-hosted.php – more settings for the IdP
- Saml20-idp-hosted.php – the metadata for all the SP’s that connect to the IdP
- Saml20-idp-remote.php – only SP’s care about this file, ignore it in the IdP
This file is probably the one you’ll edit somewhat regularly when you setup new SPs. You have to convert their metadata to flat-file/PHP (not XML) code and then add it to this file.
3.2.4.4.1. IdP Metadata
The IdP cares about two sets of metadata. The first is the saml20-idp-hosted.php file. My understanding is the hosted file means the IdP user database is collocated with this instance of SimpleSAMLphp. Then there’s the saml20-sp-remote.php file, which contains each SP’s metadata.
saml20-idp-hosted.php
This file identifies the certificates and authsource that will be used for the IdP.
<?php $metadata['ENTITYID'] = [ |
saml20-sp-remote.php
This file contains the metadata for each SP. I’ve provided example code in the Appendices at the end of this page. What you need to know is that whenever you need to add a new Service Provider to your IdP, you’ll add their flat-file (php) metadata to this page.
3.2.5 Test your SimpleSAMLphp setup
Congratulations, if everything has gone correctly with your file changes, you should have a working SimpleSAMLphp setup. Let’s find out how you did:
- Start by going to
https://[your site]/idp - This should bring up SimpleSaml’s default welcome page (yay! You have SAML working!)
- Now go to
[your_site]/simplesaml/admin- This will take you to the SAML login page IF you have the auth module enabled in the config file.
- Login with the password you set in your config.php file
- You’ll see a Configuration page with some basic stats about your SAML installation.
- Federation – this is where you see your IdP and SP metadata
- There’s a box at the top of the screen with your site’s metadata, click the grey arrow at the bottom of the box to expand it and see the data.
- When you need your IdP’s Metadata, that can be found here in the third block of code, titled SimpleSAMLphp Metadata
- The Test page allows you to test your authentication sources. Once you’ve added your SP’s metadata to the IdP’s saml20-sp-remote.php file, you should be able to test the connection from here.
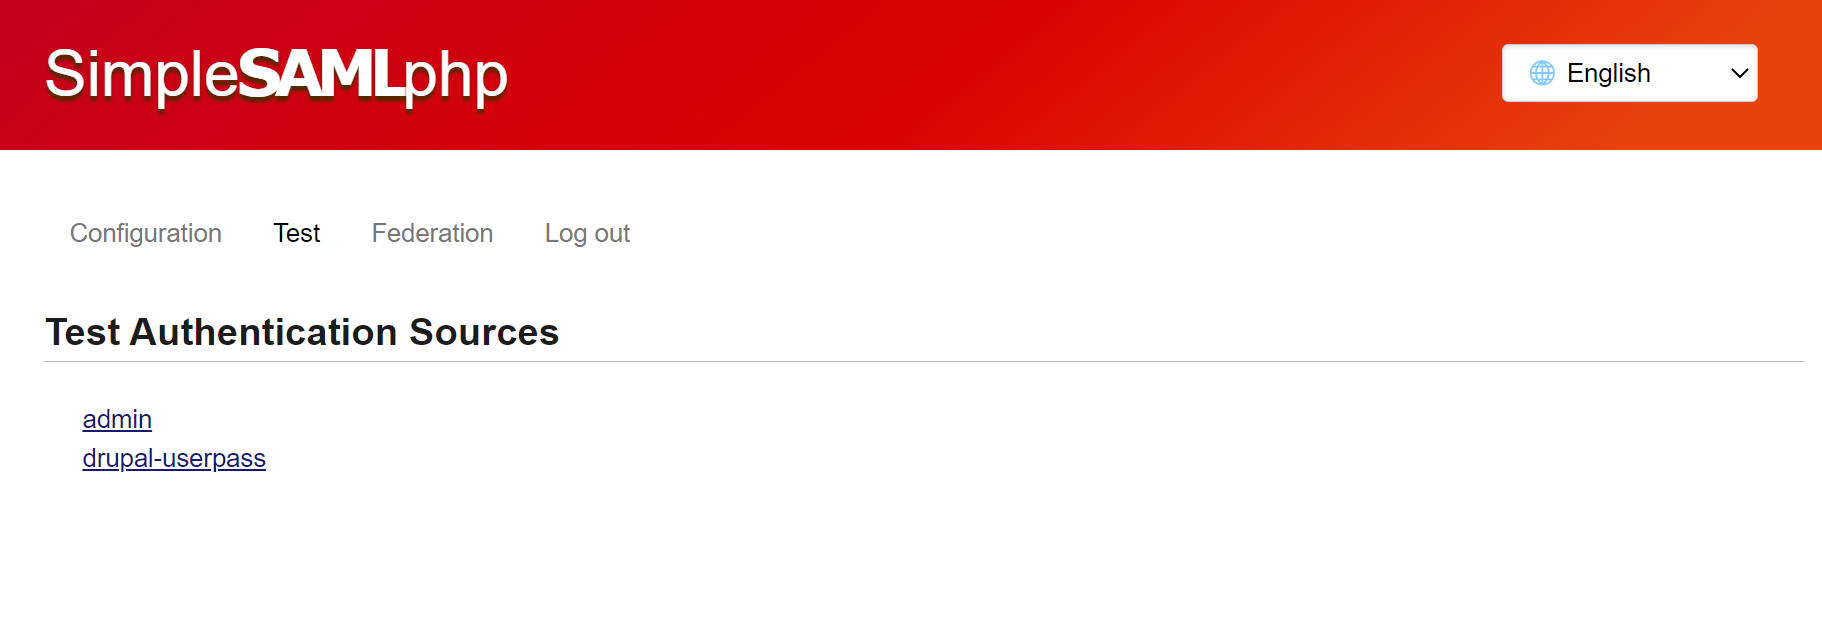
- Admin – SAML’s admin login credentials
- default-sp – this should connect to Drupal
- click on the link. It may ask you to sign into the main website
- If you authenticate successfully, it will return you to a SimpleSAMLphp page that shows all the attributes in your user account that were passed from Drupal to SAML when you logged in. (remember, from the authsources.php file?)
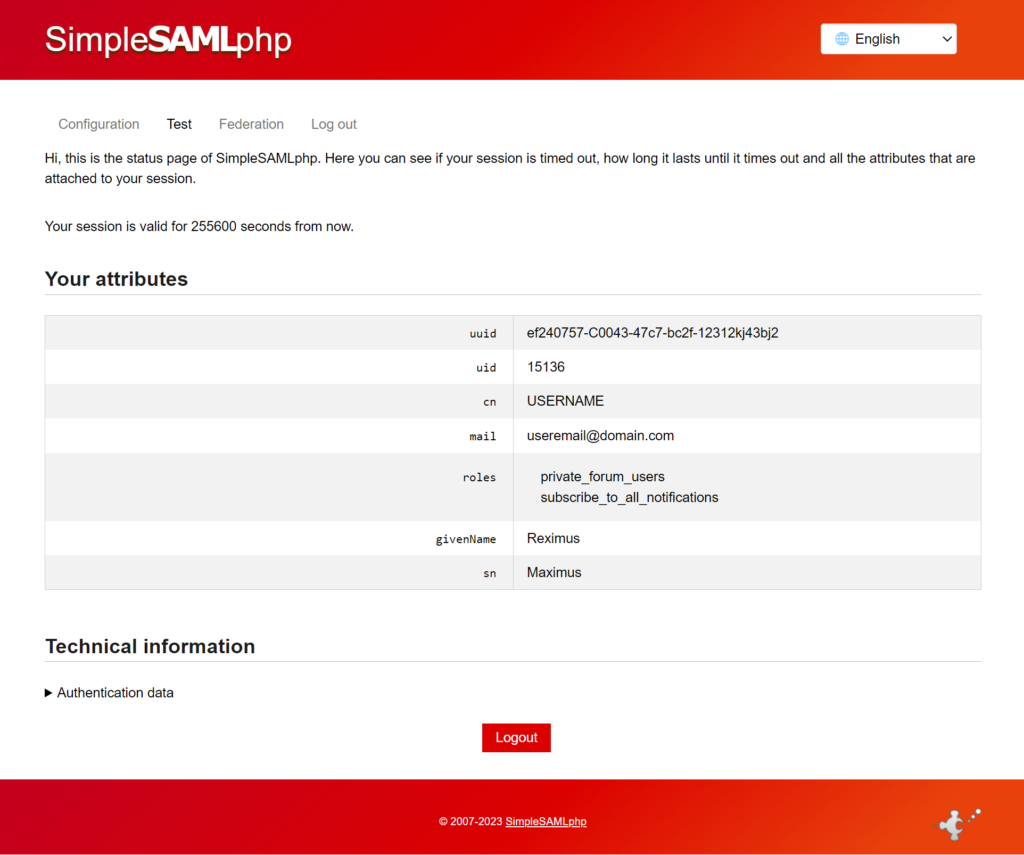
- Seeing all your attributes means that your SAML connection with your Drupal IdP site is setup successfully!
- If you’re not getting this page, it means that something between the SP and the IdP isn’t setup properly and there’s an error. I would review all your code settings and see if there are any mismatches.
3.2.6 The IdP Setup and Completion Checklist
At this point, you should have:
- In your server:
- Your apache .conf file setup to make SimpleSAMLphp’s public directory available to the world AND have set the
SetEnv SIMPLESAMLPHP_CONFIG DIRto point to your custom simplesamlphp/dev or /prod directory you setup - You should be able to access your IdP’s simplesamlphp in your browser at:
https://[your idp site]/idpand login athttps://[your idp site]/idp/admin
- Your apache .conf file setup to make SimpleSAMLphp’s public directory available to the world AND have set the
- In SimpleSAMLphp:
- You should be able to go to the Test tab and test a connection with your IdP Drupal website.
- In Drupal:
- you should have the drupalauth4ssp module enabled
- You should have a “test” user account setup with all the fields you want to pass to your SP filled in
- Your test user should have one or more roles (beyond authenticated) to send to the SP.
3.3. How do I setup a new [external] Service Provider with my SimpleSAMLphp Identity Provider?
In this section, we will setup a connection with a new service provider that is not within your own environment. This might be a company like Overdrive.com or EBSCOhost, or another service for which you want to provide your users with single sign-on option.
3.3.1. Step 1:
If you’re setting up a connection with a third-party service you need to send them your IdP metadata. This can be done by going to https://[your site]/idp and signing in.
On the Federation page, at the top, there’s bolded text that says SAML 2.0 IdP Metadata. Click on the [ Show Metadata ] link below that text to reveal the metadata.
The following images have been anonymized and do not contain real data:
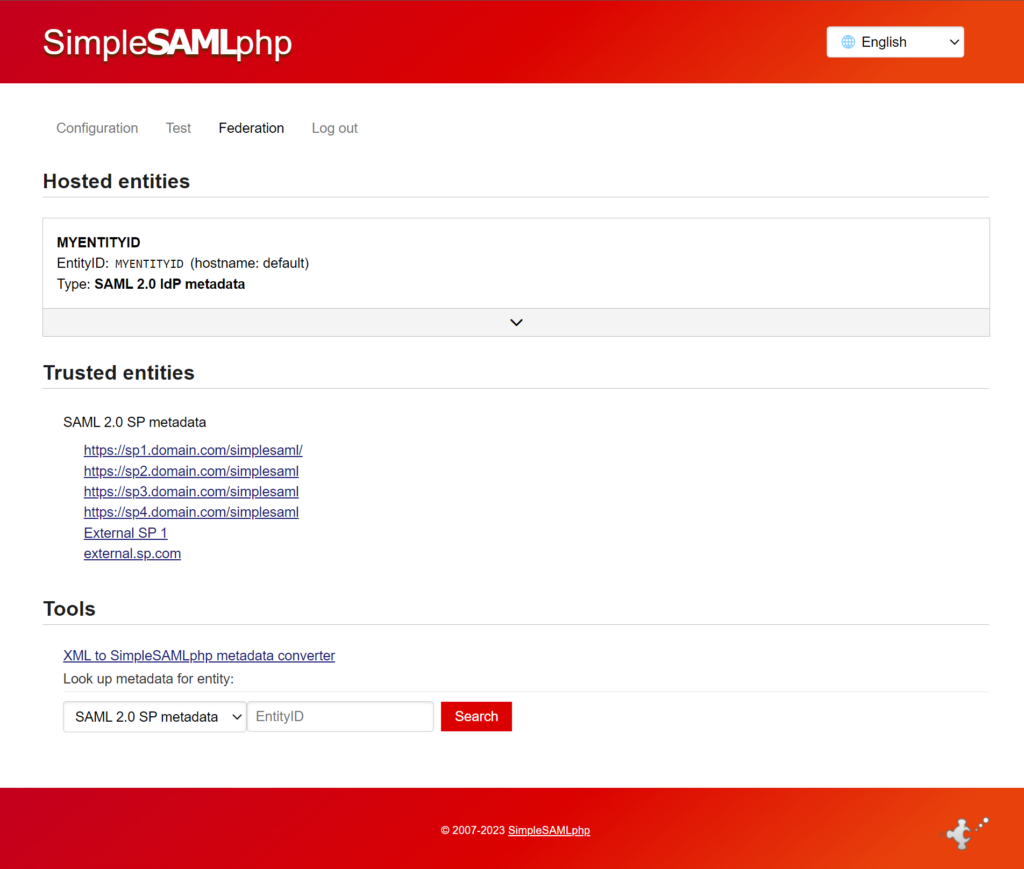
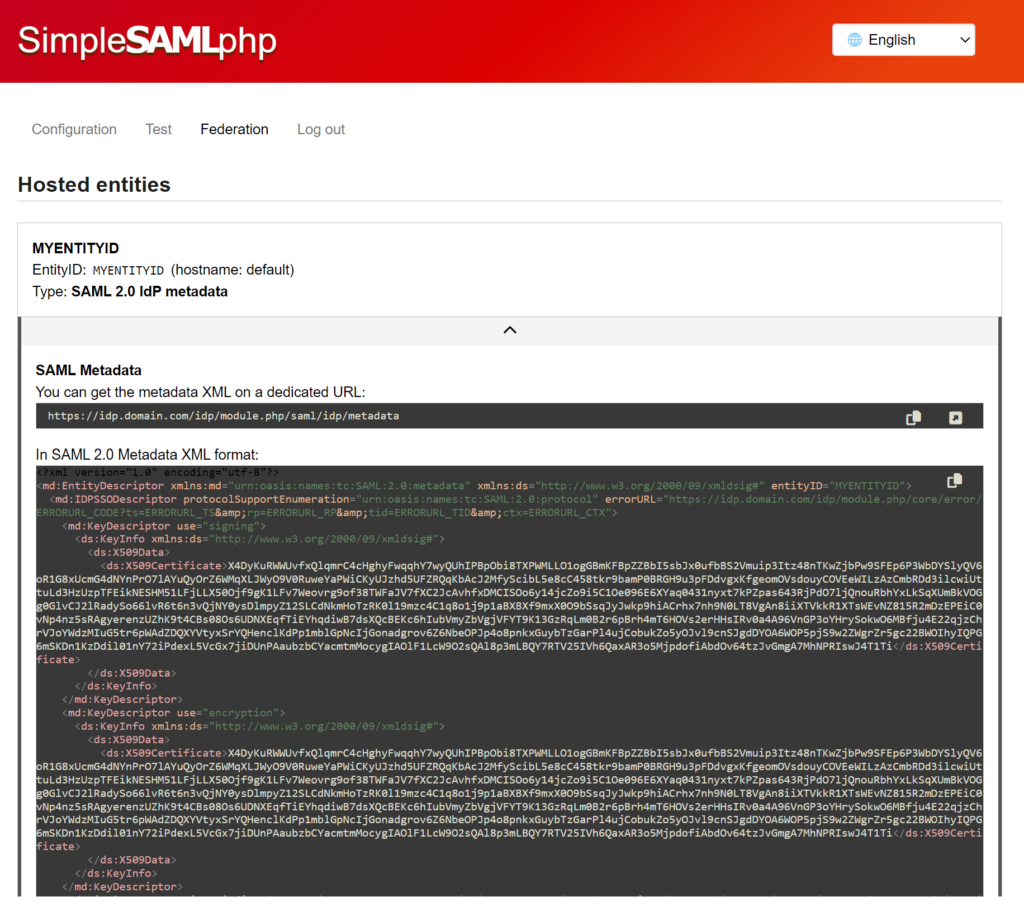
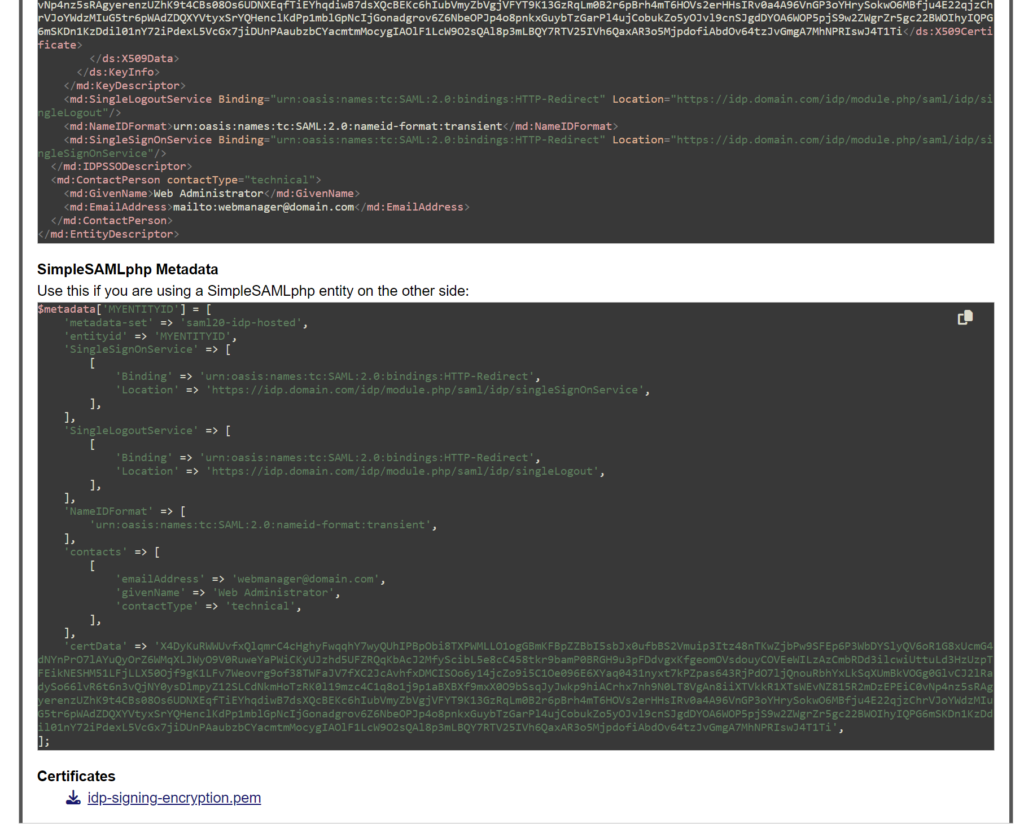
When I’m sending everything over to an SP, most times they can just grab it from the Metadata URL provided at the top, but you can send the XML and flat-file versions to them via an encrypted method.
- The Metadata URL – This gives them a downloadable php file of our metadata
- XML code – This is the XML version of our metadata, it’s pretty descriptive compared to the PHP code, so I’ve found it helpful to send in the past.
- Flat File format (php) – This is what we use with SimpleSAMLphp in its files, sometimes helpful for others.
- The Certificates – I tend to not send these. They’re included in the Metadata and no one has ever asked for them.
3.3.2. Step 2:
Once I’ve sent them our IdP info, then they send us back their SP metadata and that is added to the /var/www/html/[site root]/simplesamlphp/dev/metadata/saml20-sp-remote.php file.
Make sure to add a code comment to let your team know when the connection was setup and what service it’s for.
3.3.3. Step 3:
Once that’s done, you can let the SP know and they should send you a URL to test the connection.
They MAY send you another, official URL once this test has completed. When you have that, you can put that link wherever it makes sense to do so on your website so that users can authenticate and access the SP. I recommend running your suggestions past the chain of command before you implement.
Once you’ve published the links, you’re good to go. Everything should be setup and working properly.
3.3.4. Maintenance
Make sure you set a reminder to send updated Metadata to your SP’s if your certificate expires or if your SAML goes through a major version upgrade. Our IDP metadata changed between SAML 1.9 and 2.1.
3.4. How do I setup a new [internal] Service Provider?
(a subdomain website)
The process is similar to the above steps, but you’re going to be doing all the work yourself instead of collaborating with an external team.
3.4.1. Setting up a Drupal site to be a Service Provider (SP)
This step assumes you have installed Drupal 10+ using Composer and Drush already. In the command line, run the following:
composer require ‘simplesamlphp/simplesamlphp:^2.1’ ‘drupalauth/simplesamlphp-module-drupalauth:^1.9’ 'drupal/simplesamlphp_auth:^4.0'This installs SimpleSAMLphp, the SimpleSAMLphp DrupalAuth module, and Drupal’s SimpleSAMLphp_auth module. Enable the simplesamlphp_auth module with drush: drush en simplesamlphp_auth
3.4.2. Apache Config Files
NOTE: This section is a duplicate of the IdP section above. You still need to do these steps for each SP and the IdP.
In order for your SAML to be made available to the internet, you need to create a symlink or alias for it. Here, you also make simplesamlphp’s public directory open to the public. This is intentional, the public directory is designed to be a web user interface for SAML management.
The files you need are the .conf files, found in /etc/apache2/sites-available/[website].conf
When you edit one of these .conf files, you’ll need to create a section inside your site’s <virtualhost> tags (probably at the bottom), for SAML with the following parameters.
# ****************************************# ENVIRONMENT VARIABLESSetEnv SIMPLESAMLPHP_CONFIG DIR /var/www/html/[site root]/simplesamlphp/dev/config# Set an alias to the SimpleSAML directory# In some systems this is setup as a symlink, but I prefer this method.Alias /idp /var/www/html/[site root]/vendor/simplesamlphp/simplesamlphp/public# OR for SP:# Alias /simplesaml /var/www/html/[site root]/vendor/simplesamlphp/simplesamlphp/public# Set Access Rights<Directory /var/www/html/[site root]/vendor/simplesamlphp/simplesamlphp/public> |
The first block of code sets a SimpleSAMLphp environment variable that tells SimpleSAMLphp in the /var/www/html/[site root]/vendor/simplesamlphp/simplesamlphp directory to look in /var/www/html/[site root]/simplesamlphp/dev/config directory for all configuration settings.
Why do this? Because we don’t want Composer overwriting our configuration settings with default code and breaking SAML whenever it has an update (believe me, that’s frustrating). This puts all the SAML settings in a location we control.
The next piece sets an alias for the directory /var/www/html/[site root]/vendor/simplesamlphp/simplesamlphp/public to resolve at https://[IdP site root]/idp or https://[SP site root]/simplesaml. This is SAML’s web-facing interface where we can check on the operability of our SAML, test authentication methods, and convert metadata. (note, you can also do this with a symbolic link, described in other tutorials. I find symlinks to be troublesome, so I use this method.)
Last, we set view access rights by allowing the public directory access to the greater internet.
3.4.4. SP Local Configuration
The best thing to do is go up to section 3.2.4. The Local IdP & SP Configuration Settings. That whole section is applicable here, just stop when you get to 3.2.4.4. Metadata and come back here. You’ll need to make sure you’ve created the same file structure and file settings in your SP:
[site root]/simplesamlphp/dev/ [certs/, config/, data/, log/, metadata/, tmp/]
3.4.5. SP Metadata
SP Metadata differs from the IdP metadata because the connection is kind of reversed. You’re telling your SP the IdP it will connect to. Also, one SP doesn’t care about any other, so the setup is a little simpler and only needs an edit to the following file.
saml-idp-remote.php
This file contains the IdP’s metadata. An example is provided in the Appendices at the end of this webpage. The metadata can always be acquired at the IDP’s Federation tab in SimpleSAMLphp. You MUST add the IdP’s metadata to this file in order for the SAML cycle to work properly.
3.4.6. Create the connection between IdP and SP
Assuming you have a brand-new site you’re setting up:
- Start by logging into your IdP’s SAML page:
https://[your IdP site]/idp- Login and go to the Federation Tab to grab the IdP metadata (third code block) in the box at the top of the page (shown previously). You can access it by clicking the arrow in the grey bar at the bottom of the box.
- Paste this metadata in your SP’s
[sp site root]/simplesamlphp/dev/metadata/saml20-idp-remote.phpfile, at the bottom.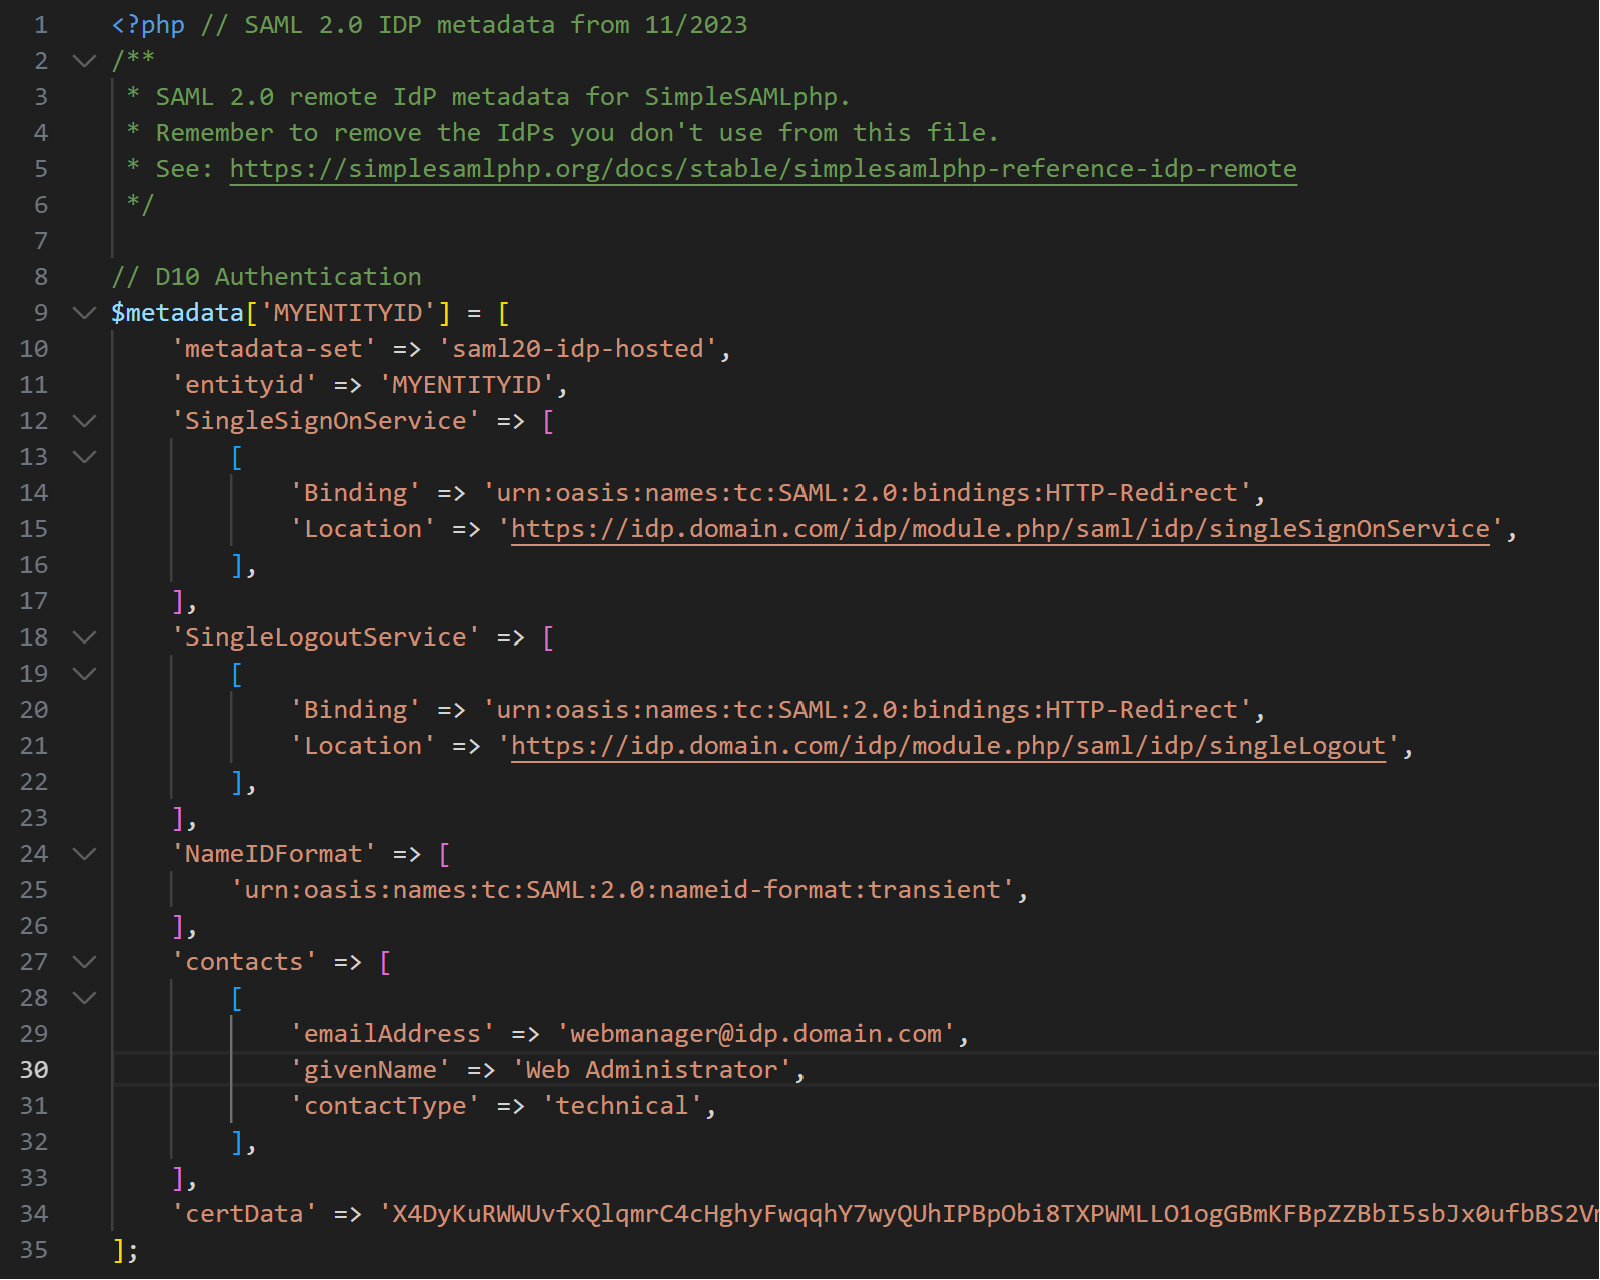
- Go to your SP’s SAML page
https://[your SP site]/simplesaml- Go to the Federation tab and grab the SP’s metadata near the top of the screen.
- Now go to your IdP’s metadata directory and update the
[idp site root]/simplesamlphp/dev/metadata/saml20-sp-remote.phpfile with the SP’s metadata. (add it at the bottom, leave yourself a note about what site it’s for and when you added it)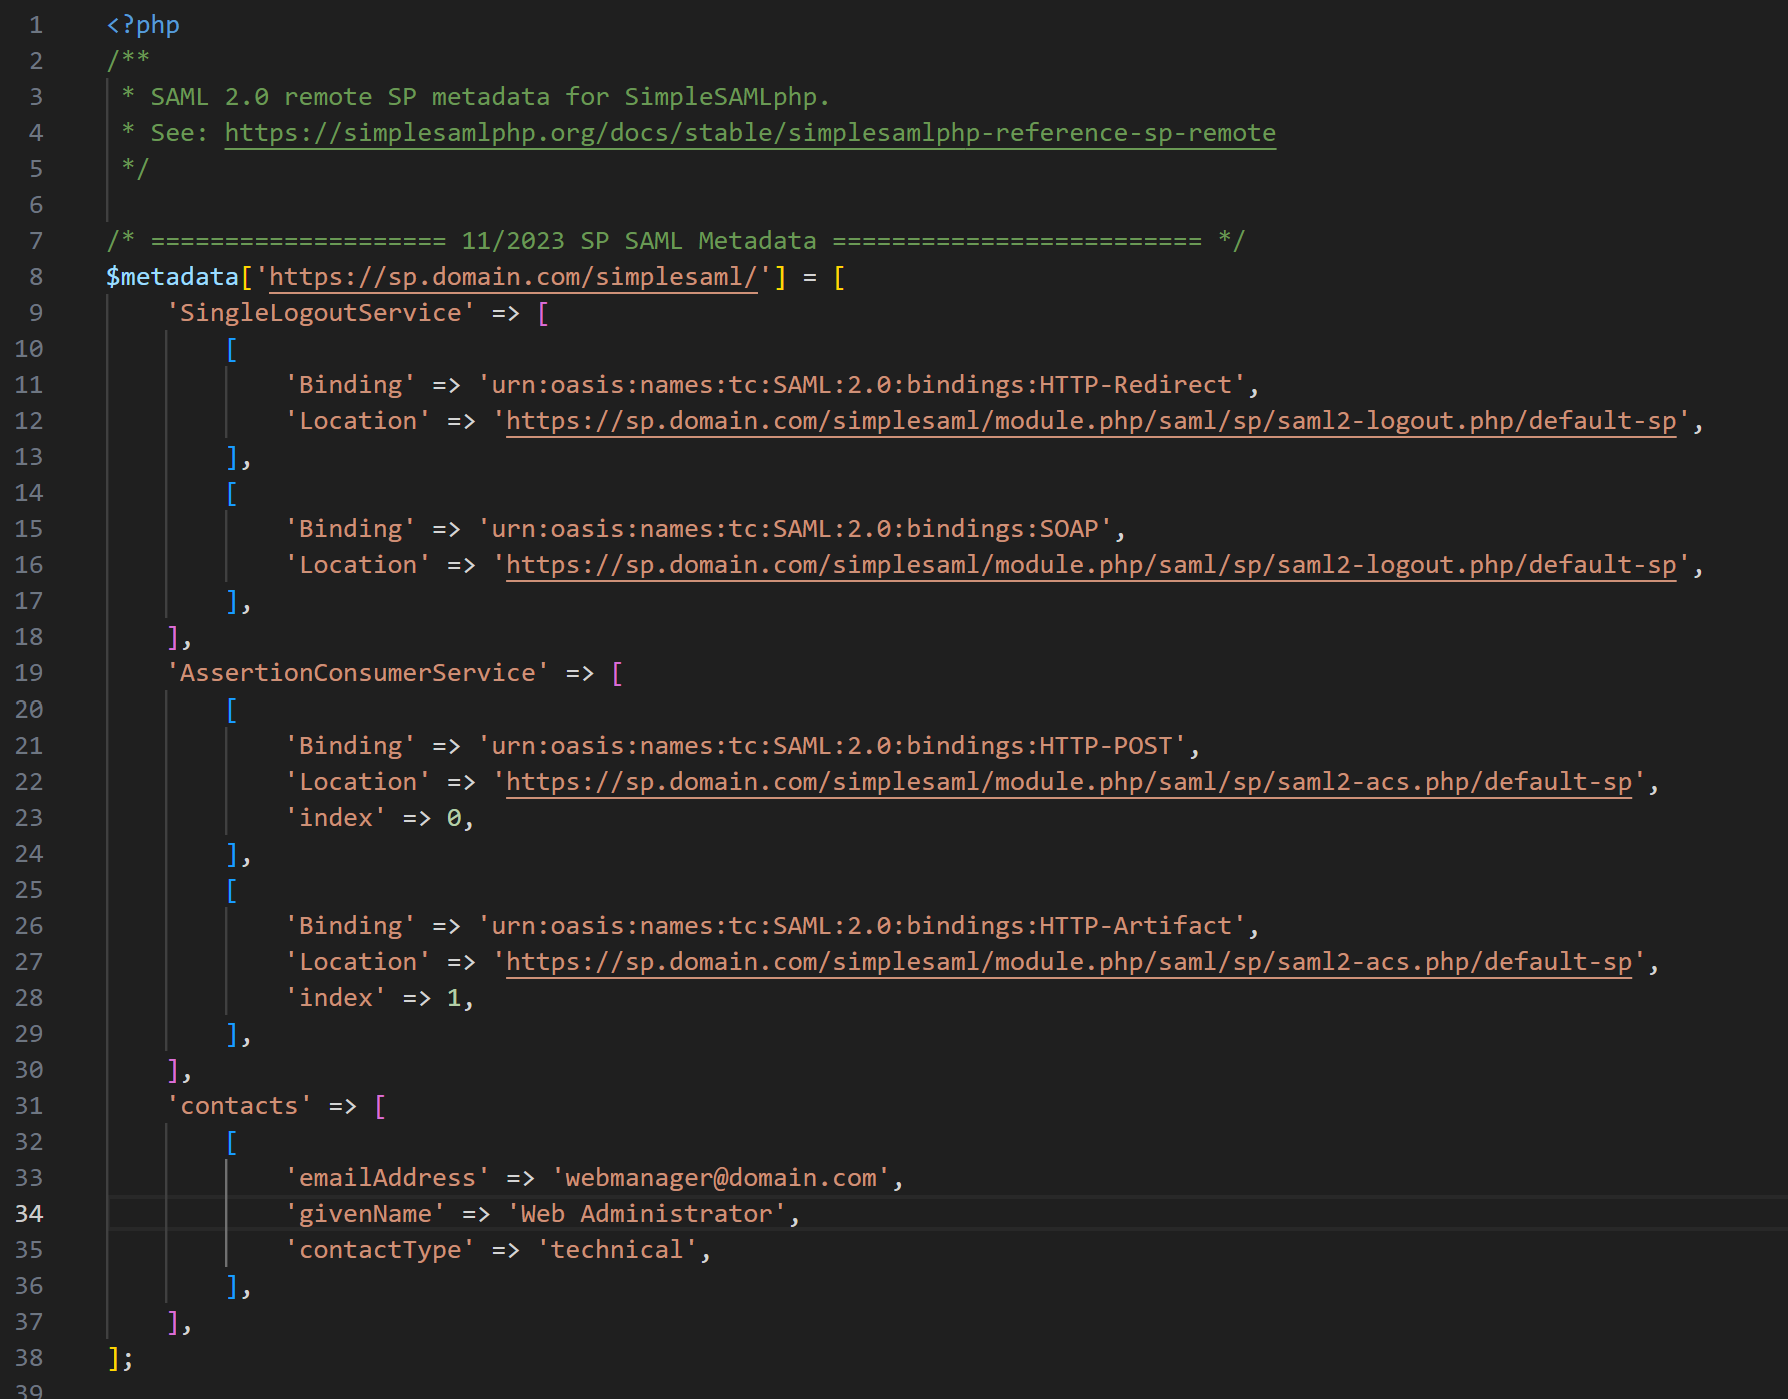
- You have now given both the SP and IdP each other’s metadata which makes it possible for them to communicate with each other.
- In the SP site, you’ll need to install/enable the drupal/simplesamlphp_auth module and enable it if you haven’t done so already. Instructions for how to do this are in section 3.2.2 Setting up a Drupal site to be a Service Provider (SP).
- Once the module has been enabled, go to your Drupal administration section and look under Configuration > People > SimpleSAMLphp Auth settings – or, go to
https://[your sp site]/admin/config/people/simplesamlphp_auth- In the Basic Settings, set the following fields:
- Authentication source for this SP: default-sp
- Authentication source for this SP: Login with Single Sign-On Login
- Display a link to the Federated Login page on the user login form: enable this
- User Provisioning: enable this
- Security: Cookie only transmitted over HTTPS: enable this
- Save the settings
- Local authentication
- Allow authentication with Drupal accounts: enable this
- Which ROLES should be allowed to login with local accounts? Administrators and Administrator Developers
- Save the settings
- User info and syncing
- SimpleSAMLphp attribute to be used as unique identifier for the user: mail
- SimpleSAMLphp attribute to be used as username for the user: cn
- Synchronize username on every login: enable this
- SimpleSAMLphp attribute to be used as email address for the user: mail
- Synchronize email address on every login: enable this
- Automatic role population from simpleSAMLphp attributes: We’ll come back to this later, there’s a full tutorial below (section 3.4.1).
- Reevaluate roles every time the user logs in: enable this
- Automatically enable SAML authentication for existing users upon successful login: enable this
- Go back to Basic Settings and enable Activate authentication via SimpleSAMLphp
- In the Basic Settings, set the following fields:
- If you haven’t yet, in your IdP, create a user account for testing purposes.
- To login to your SP, open an Incognito tab or different browser.
- Login Method 1:
- go to https://[your sp site]/saml_login
- You should get redirected to the IdP’s Drupal Login page to get logged in
- Upon a successful login, you should automatically get redirected from the login page, back to the SP as an authenticated user.
- Login Method 2
- go to https://[your sp site]/user/login
- In the login form, you should now see an additional link that will take you to your IdP to login. If you followed the instructions above, the link should say “Login with Single Sign-On Login”
- Login Method 1:
- If you’ve successfully logged in, you’ve setup SAML correctly. At this point, I replace Drupal’s link to /user/login with a link that goes to /saml_login so that everyone gets to the right place automatically.
- Once you follow the Role Management tutorial below (3.4.1), log out of your SP and then log back in, now check your test user’s roles. They should have transferred over based on the rules you setup in the Automatic role population from simpleSAMLphp attributes field. You can now setup permissions for all the roles on this site to ensure users only have access to what they need.
3.4.6.1. Mini tutorial for role management with Drupal and SimpleSAMLphp
If you remember in the SAML test page (or the attributes from the authsources.php file), you could see all the attributes that get sent to the SP from the IDP when you log in. These include fields like email and roles. We’ll use these fields to assign people roles in the new system automatically when they get here from the IdP.
Here’s how the field works, we’re going to setup a bunch of rules and the system will compare every user’s SAML info on the way in and instantly assign them the right matching roles for us. It’s incredibly brilliant.
How to create a rule:
Example: sp_role:roles,=,idp_role|
sp_role– this is the role here in the SP that you want to assign someone when they meet the criteria for this rule:roles,=,– this is the programming/math bit of the rule. It’s saying the thing we defined before the colon is a role. In order to assign the role, it has to exactly match (=) the following in the user’s Role SAML attribute.idp_role– this is the machine name of the role that is coming from the IdP in the User’s SAML attributes.|– the pipe at the end separates this rule from the next one. Note that the final rule in this field should NOT have a pipe character.
So, a set of role assignments will look like this: info_center_staff:roles,=,info_center_staff|nic_advisory_board:roles,=,advisory_board|nic_staff:roles,=,nic_basic_staff
Best practices, learned from experience:
- Consider making all your SP’s roles have sp_ at the beginning of them in the machine name. This makes reading this block of rules a little easier and helps you know which Role is which in the equation when you’re sight-reading it.
- Match the names all your roles. It’s so much easier when you know you’re matching the SP role to the correct IdP role. Matching role names is the best way to do this.
- SAML ignores any rules that don’t apply, so you can leave yourself a rule key (see the example at the top) at the beginning of your rules to help yourself out in the future if you add roles to the site.
- When you want users on your SP to have a new role, remember that you’ll also need to create that role in the IdP. All user role management needs to be done in the IDP because the SP reevaluates user roles every time a user logs into the SP. We also don’t want to have to manage users in multiple places. If we know everyone is managed on the main website, then that’s an easy place to know we’re getting it right every time.
Example 2: Assign roles based on email address
I set this up when we first started using SAML. These days, I prefer to just do everything with Roles, but I’m showing this to you incase you need it.
This worked better when our small staff all had @domain.com email addresses, it works less well, when your organization is huge, and everyone has the same email address. That said, if your organization needs its own role, this can work great.administrators:mail,@=,domain.com|administrator_developers:mail,=,rex@domain.com|
- In the first rule, we’re assigning the role of administrators to anyone with an email address that ends in(@=) nicic.gov
- In the second rule, we’re assigning the role of administrator_developers to the person whose email (:mail,=,) matches rex@domain.com
Best practices, learned from experience:
- This email method is nice for a person or two, but you don’t want to be managing hundreds of users with individual email addresses.
- The other problem is that if rex@domain.com is fired or quits, you have to remember that you put in this bit of code and take it out!
- Aside from the obvious, if we delete Rex’s account and he makes a new one, with the same email, it won’t have the same roles, but this SAML rule ignores the roles on his account and has just assigned him as a full-fledged administrator!
- If we keep his original account, but remove his administrator rights at the IdP, the same thing happens – when he comes to the SP, he’ll be granted full Admin rights!
- An unhappy un-privileged person can cause a lot of damage. Since all permissions are managed by roles in Drupal, we suggest only using rules from Example 1
4. Follow up Actions
Your SAML setup should be used by staff and users daily. Make sure your staff know how to identify a SAML issue (usually problems getting redirected to the IdP or SP during login/logout) and report it to you.
User/Role: Web Developer
- Action: Set reminders to rotate certificates on a regular basis, in compliance with security best practices.
- Action: Keep an eye on SimpleSAMLphp development as well as the modules for Drupal. SAML often becomes a key service in your infrastructure, and you want to know about any vulnerabilities or problems others are facing.
User/Role: Program Manager
- Action: Take note of when certificates expire and remind web developers to rotate the certificates.
User/Role: Other Staff
- Action: Learn about how to identify a SAML problem and report it to Web Developers
5. Resources
This section is for anything that didn’t fit into the previous sections.
5.1. Related or Useful Resources
I am not promoting or representing the following recommendations, I have no ties to these recommendations, other than that I have found them helpful in the past and, at that time, had good experiences with them. I cannot vouch for your experience with them or how they may have changed since I interacted with them.
Chrome Extensions:
These are useful to people who need to troubleshoot SAML. As of 2023, I’m finding the SAML errors to be pretty descriptive and I’m able to troubleshoot without these extensions, but I want to mention them here just in case. Most of them work by having you attempt a SAML authentication and then looking at the SAML tokens that are sent between the IDP and SP. Typically, you’re looking for some piece of data that is pointing to the wrong place or another setting that’s misconfigured.
- SAML Chrome Panel
- SAML Message Decoder
- SAML Dev Tools Extension
- And others…
Other useful guides
These are some other useful guides that best helped me understand how to setup SimpleSAMLphp with Drupal. They’re a little outdated now, but I’m sure they can add some extra perspective.
- Installing SimpleSAMLphp:
https://www.hashbangcode.com/article/installing-simplesamlphp-using-composer - Setting up an SP:
https://www.hashbangcode.com/article/drupal-9-configuring-drupal-authenticate-against-remote-simplesamlphp-identity-provider - Setting up an IdP:
https://www.hashbangcode.com/article/drupal-9-configuring-drupal-be-identity-provider-simplesamlphp
Useful SAML Assistance
In the past, I needed SAML help and hired https://idmengineering.com/saml-support to help us resolve SAML connection issues we were facing and didn’t have a grasp of SAML enough to understand. They were hired with the approval of my then manager and other stakeholders. If the above guide and settings in the files don’t resolve your issue, this company may be able to help.
5.2. Troubleshooting SAML
There is no super-easy way to instantly fix SAML issues. I will try to keep this section updated with problems I run into, but no promises. I recommend you keep your own log of errors you run into and how you solved them.
5.2.1. SimpleSAMLphp 500 error
When upgrading from version 1.9 to 2.1, I encountered a 500 error on the front page of SimpleSAMLphp. This was resolved by updating the config.php file. There were some changes between the versions that fixed the issue once resolved.
From this, I learned that the config.php file can be picky. Figure out a working version and then test with baby steps if you’re doing something that’s breaking the setup.
5.2.2. Can’t login to SimpleSAMLphp (page not found)
The login for SimpleSAMLphp itself is defined in the config.php file, so if you need to reset the admin password, do it there. In between maintenance, I turn off the Admin module in the config.php file to reduce the opportunity for attackers to break into SimpleSAMLphp. If you go to https://[your site]/idp/admin or https://[your site]/simplesaml/admin and it gives you an error, try enabling the admin module in the config file.
5.2.3. Trouble logging in/out and getting redirected to the SP or IdP
This might be a metadata problem. Make sure your IdP has your SP’s metadata and the SP has the IdP’s metadata. SimpleSAMLphp 2.1 is much better with descriptive errors than version 1.9.
6. Appendices
6.1. Apache .conf file example snippet (IdP & SP)
The following code goes in the virtualhost settings at the bottom. Since our sites only resolve on HTTPS connections, we only put these settings in that section, and it seems to work pretty well.
# ****************************************SetEnv SIMPLESAMLPHP_CONFIG DIR /var/www/html/[site root]/simplesamlphp/dev/config # Set an alias to the IdP SimpleSAML directoryAlias /idp /var/www/html/[site root]/vendor/simplesamlphp/ simplesamlphp/public# OR for SP: # Alias /simplesaml /var/www/html/[site root]/vendor/simplesamlphp/simplesamlphp/public # Set Access Rights <Directory /var/www/html/[site root]/vendor/simplesamlphp/simplesamlphp/public> |
6.2. The IdP & SP config.php file
<?php //IdP config file 2023 'module.enable' => [ |
6.3. The IdP authsources.php file
<?php// these can be removed if you don’t need them // Key: array('field_name' => 'drupal_field_name', 'attribute_name' => 'target_field_name_sp_needs'), |
6.4. The IdP metadata saml20-idp-hosted.php file
This file identifies the certificates and authsource that will be used for the IdP.
<?php |
6.5. IdP metadata saml20-sp-remote.php
<?php |
6.6. The SP authsources.php file
<?php |
6.7. The SP metadata saml20-idp-remote.php
$metadata['[your entity ID]'] = [ |